Our teardown of R2-D2 shows what’s inside this little droid with a big personality.
One of the hot new toys released in advance of the new Star Wars movie is R2-D2 by Sphero, the same toymaker that developed the BB8 for the 2015 Star Wars sequel called The Force Awakens. As with the BB8, R2 is controlled by an app you download and run from a smartphone. There’s no wireless charging; the robot recharges via a standard USB connection.
Our team recorded a video describing how to use the app, so we won’t spend any time on it here. Suffice to say the R2 robot has a lot more personality than the BB 8.
We’ll get straight into taking R2 apart. We’d have to say that taking the toy apart is a lot like disassembling an engine on a car in that you have to figure out the right sequence of steps. Get the sequence right and R2 comes apart readily.
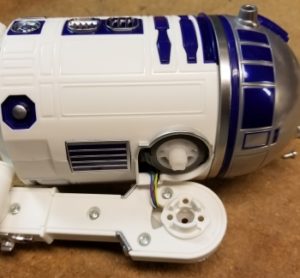
R2’s arms pivot to an angle when it’s time to travel. And the first step in disassembling R2 is to take off his arms. There’s a cover on the top portion of each arm which hides screws holding the arm to the pivoting mechanism in the shoulder. Remove the screws and the arm comes off. With R2’s arm off, the wiring to the servomotor in the base becomes evident.
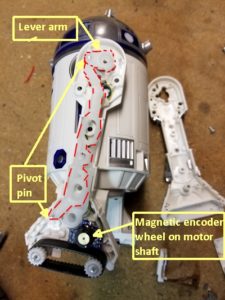
There is also a cover on the inner surface of the leg that pops off to reveal a long plastic lever arm between the pivoting mechanism in the shoulder and the foot. This lever arm keeps the foot in contact with the ground when the leg pivots to let R2 start moving around.
R2 has a servomotor in the base of each leg. The servomotor connects to the track drive through a gear train that reduces the motor speed and boosts the torque. The servomotor and the geartrain become visible by removing a small cover in the foot of the arm. It’s evident that the servomotor includes a feedback loop because a magnetic encoder disk and Hall effect sensor is evident on the motor shaft to provide feedback about the position of the motor shaft.
Once the arms are off you can remove R2’s main body panels. The cover for the cylindrical part of the body is in two pieces. One piece is held on with a couple screws and comes off pretty easily. The other cylindrical panel only detaches after first removing the top dome-shaped cover on R2’s rotating head. The dome covering comes off by rotating the head to get at two snap fits. The snap fits are rather tough to manipulate. Because our R2 wasn’t going to be reassembled, we Dremeled the snap fits off to remove the dome cover.
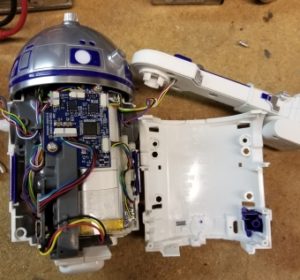
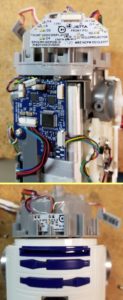
Once the dome is off, the other cylindrical side panel comes off to reveal, among other things, the speaker and Lithium-ion battery underneath it. With all the panels off you get a good view of the two main electronics boards and two smaller boards holding LEDs for R2’s blinking dome lights.
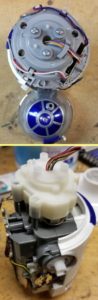
We’re down to the last few mechanical components that go into R2’s locomotion. There’s a piece to which the top dome panel attaches. It is fastened on with screws. Removing it reveals the servomotor that rotates the turret and a feedback encoder. The feedback encoder is interesting in that rather than being an incremental encoder, it is just a potentiometer. The motor controller senses the changing potentiometer resistance to decide how to rotate the motor shaft to rotate the turret.
There’s a second potentiometric encoder, like the one sitting in the turret, that sits on the main chassis of R2. This potentiometer provides feedback about the position of the foot that extends to the ground from R2’s body and slides along when R2 moves. The servomotor that moves the foot is the same one that angles the two arms into position to let the robot move around.
With the circuit boards moved from R2’s plastic frame, we are getting down to the robot’s main chassis. The chassis consists of two pieces fastened together with screws. Removing them gives us a clear view of R2’s foot. It sits on a lever arm that moves via cam action when the servomotor rotates the arms into position to let R2 move around. And that’s finally it for R2’s mechanics. Now we move on to the electronics that control all the movement and sound effects.
Two main boards hold most of the electronics with three other smaller boards on the turret and main chassis that hold LED indicators. One of the main boards holds an STM processor that consists of an ARM Cortex-M4 core together with a DSP, floating point unit, and a few other things. Near it sit two motor driver chips from Texas Instruments. Each driver chip can control two motors and can implement motor speed control through pulse-width modulation. That makes sense because there are four motors on R2. What’s notable about the motor driver chips, though, is that while some motor driver chips will handle velocity or position feedback signals, these don’t. So the STM processor runs the feedback calculations for all four feedback loops.
You need position feedback to move the turret or change the angle of the arms, and you probably need velocity feedback to handle the track motors in R2’s feet. We’re guessing that the feedback loop in the track motors is probably a velocity loop rather than a position loop because a velocity loop is easy to implement.
The other main board on R2 contains an audio amp chip to run the speaker and generate the sounds that give R2 a lot of his personality. It also contains the Nordic Bluetooth chip and antenna, a reset switch, and the battery charging circuitry and USB charger socket. There’s also what appears to be a flash memory chip from Winbond, though the markings are a bit scrambled and hard to make out.

Now you might wonder what the flash chip does in that the Nordic Bluetooth chip already has 512 kilobits of flash. But the fact that this board holds the audio amp powering the speaker gives us a clue. We’d guess that the Winbond flash holds R2’s digitized vocabulary which gets fed out to the digital audio chip.
And there you have it. As Luke Skywalker might say, we’ve been through a lot with this little droid.


Leave a Reply
You must be logged in to post a comment.